Saturday, January 21, 2012

The Love Block


Recently we received this as a favor at a wedding we were in:


It's a love block.  You take one home, and you and your spouse take turns hiding it for each other in places you know it will be found unexpectedly.  It serves as a little love note, a reminder that your spouse is thinking of you even if he's not there.


Sometimes it's a few days before we find it, and other times it's hidden several times in one day.


It is by far the best wedding favor I have ever seen.


It's fun to come up with a new place to hide it.


It's been in sock drawers,


Coffee cans,


Cabinets,


Pockets,


Under pillows,


In medicine cabinets,


And it always makes you smile when you come across it :)


Monday, January 16, 2012

DIY Custom Pull-String Pinata - No Mess!

Of the many DIY pull-string pinatas blog posts I *tried* to find, none of them was a decent tutorial, and they all started with, "Buy a pinata."  Please. 

I figured it didn't need to be papier-mache, since I wasn't hitting it, and it didn't need to be shaped, because it could just have a picture on it.  So this is what we came up with:


I think it looks awesome.

I already had every single thing I needed to make this, so it didn't cost me a dime and it is pretty much perfect.  They would charge you 20 bucks for this in a store.

We obsessively save tissue paper from gifts and large boxes from purchases, and today it paid off.


It's reusable, too.  Just refill it with candy and slap a different character on the front.  Good to go.

You can get free printables on Nick Jr's website in all their popular characters.  I'm using them for a lot of different aspects for this party, which will get its own blog post next weekend.

Here's your honest-to-goodness tutorial, no papier-mache required.

Materials:
1 cardboard box of desired pinata size.
1 exacto knife
1 pair of scissors
1 picture (mine is of Kai-Lan)
about 4 sheets of tissue paper, desired colors.
adhesive of some kind - I used glue sticks and scotch tape.
curling ribbon

Decide where the front of the pinata is going to be, and cut a trap door in the bottom with an exacto knife, box cutter, or razor blade of some kind.  I had my husband do it.  We made it fairly large so the candy wouldn't get stuck in the sides of the pinata.


Attach your picture to the front of your pinata with your adhesive of choice.


Fold one sheet of tissue paper in half, then turn it the other way and fold in half again twice.  You should have one short side that has no folds.  Cut a two-inch strip off of that side.  Then cut slits in it to create a fringe.  Because it's folded, you will only have to cut a few slits in it, then when you unfold it, the whole thing will be fringed.


Apply a line of adhesive to the bottom of your box, then attach the strip of tissue paper so the fringe hangs over the bottom.  Create another strip of fringe and layer it over the bottom one so only the fringe shows.  Continue applying tissue paper, all the way up to the top, working around the picture in the middle.


Then cover the sides, back, and top of the pinata in a similar fashion.  I used less then 2 sheets per color and it went pretty quickly.

Poke two holes in the top and thread a long piece of ribbon through, one end through each hole, and tie it in a knot on the inside of the box.  This is how you will hang your pinata.
Poke two holes in the trap door of the pinata.  Thread a long piece of ribben through both holes, so that both ends are poking out of the bottom.  Tie a knot so that pulling the ribbon opens the trap door.


Attach your decoy ribbons using scotch tape or something similar.


Fill your pinata through the trap door.  Our cardboard was sturdy enough to where the trap door itself held the weight of all the candy, but you may need to make a latch of some kind to hold the door closed until it is pulled.  You can use just a thin strip of cardboard to sit on the inside bottom of the box.  It will then give way when it is pulled.
Cut a piece of tissue paper to fit the bottom of your pinata, then poke a hole in the middle of it.  Thread your decoy ribbons (I used 11 - you need one for each child) through the tissue paper, and attach the tissue paper to the bottom.  Now you can't tell which ribbon opens the trap door!


Hang the pinata and play the game when you're ready.  Some people like to pull them one at a time, but I'm afraid of the first child pulling the right ribbon, and no one else getting a turn, so I have all the kids pull their ribbons at the exact same time.  That way everybody gets to open the pinata and you don't have to worry about making toddlers stand in a line.  


ENJOY!

Monday, January 9, 2012

Mod Podge :)

I have discovered Mod Podge.  I don't know why I've never heard of it before; maybe because my mom doesn't really do this kind of crafting, but I like it :)  I hope I won't go too crazy on it and drive the hubs nuts.

Mod Podge is a brand name; it's a glue and sealant suitable for use on many different materials.  It's about 8 bucks at Michael's.

I've only completed one project so far, but I will update this post when I finish the other.  I hit a snag and had to walk away from it.

Here's the one I finished:


It's scrapbook paper mod podged to mini canvases, with ribbon glued to the back for hanging.


The recipient didn't have a name picked out.


It's difficult to take pictures while covered in wet glue, so that's all you get visually, but here's a written tutorial :)  This is a combination of ideas I got on Pinterest:  one of mod podging photos to canvas, and another of mod podging scrapbook paper to wood.

Cut squares, slightly smaller than 4 x 4, in your desired paper to go on the front of the canvas.

Measure the sides of your canvas and cut strips to wrap around the sides, slightly narrower than the side of the canvas. 

My cuts are a little too large, I think it would have worked better if I'd cut them smaller.

Cut letters out of desired paper - I used my cricut, and the Learning Curve cartridge.  They are 3" letters with a shadow.

Lighter paper works better than cardstock.

Adhere your letters to your square papers using scrapbook adhesive.

Using a craft brush of some kind, apply mod podge to front of canvas, then to back of square paper, and adhere, smoothing with the handle of your paintbrush to get rid of air bubbles.

Allow to dry (it doesn't take long) and repeat with sides of canvas, then cover the whole thing in more mod podge.  It will look milky white but dries beautifully clear, and now the whole thing will be sealed from minor damages.

You will have some white canvas peeking through on the edges.  Use a sponge brush to apply paint for the fuzzy edged look I have here, and to cover up the rest of the canvas.

Cut desired lengths of ribbons (mine are 9"), tie them in a bow at the top, and attach the ends to the back of the canvas using super glue.


That's it :)  I would love to do it in neutral colors spelling out our last name, to hang over the front door.   

Sunday, January 8, 2012

Chocolate Cabernet Cupcakes

After the unbridled success of the Sparkling Champagne Cupcakes I made on New Year's Eve, I was inclined to further browse Sprinkle Bakes for more of her amazing creations.  I came across these Chocolate Chianti Cupcakes.  Hubs is a big Cabernet fan and he loves it with chocolate, so I figured this would be equally awesome.


They were awesome, but I like the champagne batch better.


Full credit for this goes to Sprinkle Bakes.


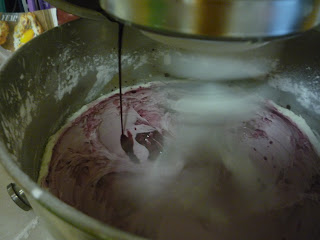
You start by making a little dark chocolate sauce, then mixing up your plain ole' cupcake batter.  You then add chocolate and red wine, alternating between the two.
I made these on my birthday.


I ran out of cupcake papers and had to switch to minis, so I'm glad these do not have a filling.  I love LOVE love mini cupcakes though.


They bake flat but they turn out moist and delicious.


The frosting was the disappointment here; I think I added too much raw wine at the end and it separated.


 It still tasted really good, and it gave it a speckled color which isn't TOO unappetizing, I suppose.


I can't eat these cupcakes fast enough and they sit around for a week before I finally decide I probably shouldn't be eating them anymore.  I should probably freeze some next time.

Sunday, January 1, 2012

Grown-Up Cupcakes

We had some friends staying with us New Year's Eve.  We decided to forgo any crazy ball-dropping, hangover-inducing, babysitter-involving parties and instead opted for a quiet evening inside playing board games, BUT I still wanted a special recipe and found these beauties on Pinterest:


And wouldn't you know it, they are as tasty as they are beautiful.  I have never been impressed by a cupcake before, and now that I know I can make something like this, I may never stop.  This could be dangerous.


Check out Sprinkle Bakes for the original recipe.  I followed it exactly.


Mmmmm, butter.  Can't go wrong.  It's a fairly basic batter, I imagine, though I don't make a lot of cakes from scratch so I wouldn't really know, except these are PACKED with bubbly, fruity champagne flavor.  I couldn't believe how much of the champagne flavor came through in the cake.  If you make these, taste the champagne and make sure you really like it before you invest the effort in these.  The batter is thick and I actually measured the scoops into the muffin pan, as the recipe calls for, because I really wanted them to be perfect AND THEY WERE.


Gorgeous.


You cut a divot in the cupcake for the filling.  The filling takes a bit of effort, and possibly an extra set of hands.  You may want to read up on tempering eggs before you start if you've never done it before.  This is something you do when you add a hot liquid to raw eggs.  You don't want the eggs to scramble, so there is some technique involved.


Fill the cupcakes, then trim the cone-shaped cut-out to make a lid and top the cupcake.  The filling also has a great champagne flavor to it.


The icing is the sweetest part, and my favorite :)  It's just butter, sugar, and champagne.  I mean, come on.


You reduce the champagne first to concentrate the flavor before adding it to the whipped butter and sugar.


Instead of slapping it on with a butter knife I went all-out and used a piping bag with a star-shaped tip.  You can get them inexpensively at the grocery store or you can use a gallon ziploc bag.  I ran out of icing doing it this way, so just be aware of that.  You just start at the outside, apply even pressure, and spiral your way in.  I do a complete bottom layer before moving upward, so that is really as much icing as it looks like.

These are extremely rich and decadent.  I almost (almost) had trouble finishing a whole one, but have had several now.  They also have a bit of raw champagne in them, so I wasn't about to let my kids gorge themselves on them.  That being said, I had to give them each a little taste, and they didn't care for them.  So overall not a kid-friendly dessert.  I'm strangely comfortable with that.


I found these pink guys at Michael's for less money than I could find them online.


SO festive and adorable.  Reminiscent of champagne :) And you really can do it all by yourself.  If I can, you can.  I actually found them to be easier than many of the Christmas cookies I attempted.  I did warn my husband about these for several days so he knew exactly how much childcare would be required on his part.  They are time-consuming, especially if you completely finish one part before moving onto the next, as you should.


Gooey and delicious.


Happy New Year from the 6 of us <3