Saturday, December 17, 2011

Things you can do with crayons besides color.

If you're on Pinterest you've seen a lot of these.  I picked my favorites and went for it :)

This first one was kind of silly for me to spend so much time doing.  it's meant to be a way to use your old, peeled, broken crayons.  I, not wanting to wait around for years to have those, used perfectly good, full-price, name-brand crayons.  I peeled them, which took FOREVER, broke them into pieces, had my toddler sort them into colors, and baked them in my bug molds. 


The ladybug turned out kind of cute but the others broke. 


This green one would have been SO pretty :)


Then I wanted to do these guys:


The only reason I didn't do this weeks ago is because I thought my husband would hate it.  Then he saw it at the home of some friends and he was like, Heeey!  You could do that!!  Well, duh.  I had to go buy the canvas, the crayons, and the glue gun, but these are items you could conceivably already have in your home.

You glue the crayons to a canvas and melt them with a hairdryer so the colors run down the canvas.  Any glue seems to work:  super glue, hot glue, elmer's glue; whatever you have.  Some people peel the crayons (which I did not want to do again) and run the crayon itself through a hot glue gun, but I did it this way so I could leave the wrapper on. 

For the flowers, I picked out all the greens I could get out of my two 96-count crayon boxes and my three 24-count crayon boxes, and then supplemented with brown and yellow.  I only needed some of them to run most of the way down the canvas, to look like stems, so it didn't take long.  Then when it cooled, I flipped the whole thing upside down and glued paper flowers to it.  Super cute.


For this next one, check out this original post.  Again, I did not want to run the crayons through a glue gun, but I thought I could cut out a pretty cute little girl with an umbrella and make it look like she was standing in the rain.  I used my cricut. 


Then I created a cardstock shield and scotch-taped it to the canvas it self.  I tried to make a good seal so none of the wax would get under the umbrella, and it would look like the rain was really running off of the umbrella after I out the black cutout back on the canvas. 


I think it turned out okay.  For this one, I needed ALL of the wax to go all the way to the bottom of the canvas, because rain doesn't frequently stop in the middle of the sky, so it took longer to melt.   But it's so much fun to watch them melt :)


For the next one, I wanted to use hot glue to trace the outside of the letter A, to create a wax-proof border that I could then peel off to reveal the negative.  Then I figured running it through my sticker machine would be good enough, but I should have done the hot-glue thing.  I liked the stained look I got, but if I do it again I will try to get it all completely white.


I discovered the best technique is to slowly move your hair dryer back and forth over a section of crayons to get an even-looking drip.  If you hold it in one place, the air all goes out from the center, so you will see exactly where you held the dryer.  It will splatter a little, but just slow down and back off and it will look good.  When you move the dryer away from a section, that section will magically start melting.  It's like the air pressure prevents it from flowing, so once you heat it up, back off with the air.

You will get buildup - just point the dryer at it and melt it for your desired effect.  Remember to point the dryer downward.  You can sort of control the flow of the wax with the way you point the dryer.  If you've ever burned a candle in a wine bottle, you know that wax will kind of gravitate towards itself, so you get rivers of wax.  Because of this, you won't have perfect straight lines, but lovely flowing lines that can't be duplicated or recreated :)


UPDATE : DO NOT DO THE HOT-GLUE BORDER.  Hot glue fuses itself to the canvas and does not come off at all.  I did it with a butterfly , and it turned out super-cute, but If I had messed up that hot glue it would have been trashed. 

I also touched up the letter "a" with white paint and it looks WAY better.  Updated pics:


Sunday, December 11, 2011

Raspberry Chocolate Hazelnut Stuffed Croissants with Pomegranate Reduction

Like Whoa.


After being sufficiently inspired by some amazing people who have ended up on Pinterest, I was able to come up with two of my very own crescent roll recipes.  Allow me to introduce you to:  The Best Dessert Eveeeeer.


In 30 minutes with 4 ingredients.


Tart pomegranate.  Sugary sweet nutella.  Fruity raspberry.  Buttery pastry.


First, reduce your pomegranate juice.  What happened here, is that I like pomegranate flavored stuff, so I bought some Pom and some sparkling water in an attempt to wean myself off of soda.  Unfortunately straight pomegranate juice does not taste like anything.  So I figured next time I made a fancy dessert I would make a sauce out of it. Reducing liquid concentrates the flavors.  This will be pretty tart so you can add sugar if you like, but I wanted the contrasting flavors.


Pour your juice into a small pot or saucepan and turn the heat on medium.  You want the juice to be just on the verge of bubbling, but not boiling.  You want it to reduce to about a quarter in volume, so that it is thick enough to coat the back of a spoon.  It took me about a half hour but it will depend on the volume of your juice, the pan, the heat, etc. 


While it's reducing, stuff your crescent rolls.

Lay out a sheet of seamless crescent roll dough and cut it into six squares.


Gently stretch out the squares with your hands and lay one in each compartment of a greased muffin tin.

Fill with about 2 teaspoons each of Nutella and raspberry preserves.  The more filling, the more gooey and delicious and calorie-dense it will be.


Close up the tops of them, pressing some dough around the sides, and stick them in the oven, preheated to 350.  Mine took about 12 minutes.


Remove, plate, drizzle with the pomegranate reduction, and bask in their heavenly goodness. 


Justin said they look like something out of a horror movie.  I don't care.  They are delicious.  And they are my very own original recipe, so there.  Please note that these are delicious without the pomegranate sauce as well, so feel free to leave that out and have the best dessert ever in 15 minutes with 3 ingredients.

Sweet, fruity, and nutty....like a best friend <3  (awwwwwww)


And the second of my original recipes, which again I neglected to take pictures of:

Meditteranean Stuffed Crescents

When cooking for two, you can stuff 4 of your crescents with savory ingredients and the other 2 with sweet ingredients, to make dinner and dessert at the same time.  Super fun.  You could also lay out an ingredient bar and let everyone stuff their own appetizer.

One day I was in the mood for crescent rools and I pulled out everything I had in my reserves that did not have to be cooked, which included mozzarella cheese, kalamata olives, sun-dried tomatoes, and spinach.  The next time I wanted these I used mushrooms instead of spinach.

Chop up about one tomato, two mushrooms, and two olives for each serving.  Lay your spinach in the bottom, fill with your chopped ingredients, and top with mozzarella cheese to fill.  Then cover the tops of your crescent rolls, bake, and enjoy.  So yummy.  You could reduce some balsamic vinegar to pour over the top, or add some basil inside the filling, but these are delicious just the way they are :)

I would like to promise that this will be the end of the extremely fattening crescent roll recipes, but I would be lying. 

Saturday, December 10, 2011

Christmas Cookies!!

More easy, yummy pinterest gems :)


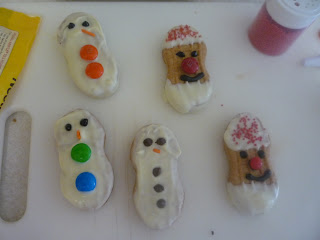
These were a little messy and I had to try a few different things but I think it was worth it.  These are just nutter butters covered in chocolate and decorated.

I tried to melt the chocolate over a double-boiler first, because I thought that was how you were supposed to melt chocolate, but it was difficult to cover the cookies in the shallow pan so then I read the directions on the package.  Then I put more chocolate in a coffee mug and microwaved it.  A tall, narrow container was better to dip cookies in than a pan on the stove.  To covere a cookie, you have to kind of use two forks to roll it around in the chocolate.  The snowmen are completely covered in white chocolate, and then decorated with mini chocolate chips.  The noses are orange sprinkles I had leftover from Halloween.  I was concerned with the bottoms getting messy so I switched to just spreading the chocolate on the top, but I should have covered them all.  It keeps them crunchy for a couple days and it looks nicer.  If you put them on parchment paper to harden they won't stick to the paper and will come off cleanly, leaving a pretty cookie.  I found that dragging the bottoms against the mug after dipping eliminated some unattractive excess.  After the snowmen hardened completely, I added a scarf with some gel tubes.


For Santa, dip each end so the middle is bare, and use black decorating gel for the eyes.  Put a dot where you want the nose and use it for the glue to stick the nose on.  You can use a red-hot or a red M&M.  Sprinkle red decors on his hat and you're good to go.


I did not think the reindeer were going to work at all, but they turned out to be my favorite, plus the semi-sweet chocolate tastes best with peanut butter.  Cover the whole thing in chocolate and lay it on parchment paper.  Press the pretzels into the side of the cookie and just let them sit there until they harden completely.  It will not seem like they're going to stick at all, but once the chocolate dries it will work perfectly. Use brown m&m's for the eyes and a red one for the nose.  These are regular-sized but minis would be cute too. 


I put all of the cookies in the freezer to harden because I was worried about time, and this worked really well.  Once they're set, you can stack them and I was a lot less worried about them not turning out.  I would do it again, next time without all the mishaps.


And now *drumroll please* my new favorite cookie.  Move over chocolate chip, there's a new star in my kitchen.

Peanut butter cups have always been my favorite candy but these are AWESOME.  And way easier than the above decorative cookies.


I bought a package of break-apart peanut butter cookie dough that made twelve large cookies.  My mini muffin tin makes 24.  So I broke each square in half and put it in a mini muffin spot.  This is important:  I greased the pan first.  This is not usually the recommended protocol when you bake cookies, but I was not about to waste 24 peanut butter cups by getting them stuck in the pan, so I greased the pan first.  Will it work without greasing it?  You tell me.  I'm not about to make that gamble.  Anyway, I stuck it in the oven and watched it while I unwrapped 24 peanut butter cups.

When they're done (and I mean your average doneness here, not raw even if you like them raw or overdone even if you like them overdone.  You want it to be cooked all the way through and not burnt.) immediately stick a peanut butter cup into the middle of the mini-muffin shaped cookie.  Imediately = have them unwrapped and waiting, do not take the cookies out of the pan yet, do not let them cool, barely even have your hand out of the oven mitt, immediately.  Press it down into the middle of the cookie so the tops are even.  And then wait.  Wait, while your kitchen smells like heaven and you have fresh-baked peanut butter cookies screaming "eat me!"  If you take them out too soon you have a higher chance of making a mess.  Just wait until the cookies are completely cooled and you can give them a little twist to get them out of the pan and shove it in your face, and oh.  my.  god is this the best cookie ever. 


You're welcome. 


This was finally a pinterest recipe that made me want to shout, I MADE THIS!!!!  And I now have an excuse to have peanut butter cups in my house at all times.  Win.

Monday, December 5, 2011

Healthy Easy Crispy Chicken.

Now that you've eaten your weight in crescent rolls, let's go for something a little lighter.

You can give your kids chicken fingers without feeling guilty about giving them "junk" food.  This is an easy, low-fat, yummy recipe.

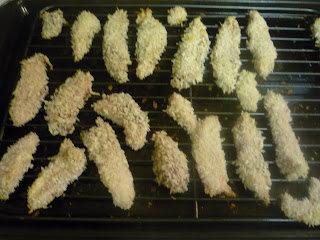
Panko are Japanese bread crumbs, and they stay crunchy during cooking, unlike traditional bread crumbs, that get soggy from the moisture of whatever you're cooking.  I love what they do to chicken; it makes it so much more fun to eat.  The natural moisture of the chicken will make the crumbs adhere, so you don't need any milk bath / egg yolk step in there to make the crumbs stick, making this dish that much healthier for you.


Just season the chicken with salt and pepper, dredge in the panko, and bake, 425 degrees for about 20 minutes.  If your crumbs start to burn before the chicken is cooked through, try covering it with foil.  You can tell if they're done by giving them a little touch with your finger.  If it feels like the tip of your nose, it's done.  If it feels like the hollow of your cheek, it's not done.  I like to put the chicken on a wire rack sprayed with Pam or something similar, the rack sitting on top of a baking sheet.  This way the crumbs on the bottom stay crispy too.  Perfect chicken fingers everytime.  The first recipe I made with this technique is here..  (Read this lady's blog.  It is amazing.)  This Margarita Chicken recipe is for tacos, but I serve them on their own with the Strawberry Salsa on the side and they are incredible.

I don't always have limes on hand for her marinade.  I do always have tequila on hand for her marinade.  But tonight I wanted to try something a little more simple.

You can serve this with whole grain pasta, tomato sauce with extra veggies, and a side of asparagus like I did.


You can serve this with Honey Mustard


(seriously just honey and mustard.  not hard.) and Sweet Potato fries to make your kids feel like they are really eating chicken fingers and fries.    The great thing about this crispy chicken is that it will really go with just about anything.  You can cut into nuggets or leave the cutlets whole to save on prep time.  You can make it as healthy or as fattening as you like :)  In my version, the only fat is whatever is in the jarred sauce, and some olive oil for sauteeing the asparagus.  I don't want to know how much fat is in those crescent rolls we ate last night :)

I couldn't even get a picture of the finished plate, we devoured it so fast.  Go get some panko to keep in your pantry and you will have everything you need.

Sunday, December 4, 2011

Pinterest Calories Don't Count.


Ha.  I wish.

I don't know what it is about the crescent roll recipes I find on Pinterest, but recently, they are all I want to eat.  It's like, hmmm, let's take a great dinner, and put it INSIDE my favorite bread.  Repin!


Why the hell not ?!?

Here is the the original idea
my version:

Pizza Rolls

1 can original crescent rolls
pepperoni
shredded mozzarella
oregano
pizza sauce or marinara

You will need to double this if your kids are older than mine.  My husband and I each ate three and the kids each ate one.

Unroll the sheet of dough.  Spread some sauce on a triangle.


Add pepperoni.


Add mozzarella.  I like it shredded.


Sprinkle some oregano on those bad boys.


Roll 'em up.


And bake according to package directions, usually at 350 for 8 to 10 minutes.


Holy easy pizza, batman.  Serve it with a salad and you are good to go.  You could also do a braid (see below)  and that would give you the freedom to add *gasp* veggies.  Baby food would be AWESOME in this.  I used to write about baby food a lot.  Check out the archive.

The pinterest crescent roll braid.  Damn their buttery goodness.  I don't why I didn't take a picture, but I will remedy that soon.  Until then, see it here.

Broccoli Cheddar Crescent Braid

Finely chop a pound of raw chicken, season it, and saute it on the stove.  Drain it, and set it aside.
Saute about half a bag of frozen broccoli and set it aside.
You should have about 2 cups of each.

Obviously, if you had leftover chicken and broccoli from a night or two before, that would be ideal.

Mix the cooked chicken and broccoli in a bowl with half a cup of mayo and 2 cups shredded cheddar cheese. 

Unroll 2 cans of seamless "dough creations" and press the ends together to make one long sheet.  Put the chicken mixture in the middle of it in a log shape.

Make slices in the dough, perpendicular to the chicken and broccoli log.  The slices should be about an inch wide.

Start at one end and lay the strips over the log, alternating sides, so that it looks like a braid.  I just sort of tuck the far ends over the log first, before braiding.  Brush the whole thing with a beaten egg and put it in the oven.

It takes longer to bake in this form, at least 20 minutes but probably closer to thirty, or even longer.  Just keep an eye on it.

This is YUMMY.


Still not inspired?  Check this out.


Yeah.  That got your attention.


Peanut butter.


Chocolate.


Roll.


Bake.


Eat.


To make the chocolate sauce, put a handful of chocolate chips in a bowl with a few pats of butter and microwave until melted.  Add butter or chocolate to reach drizzlable consistency.

Now get pinning :)