Ugh. Lost my camera charger and have no supplies for cooking or crafting, thus the *chirping crickets* on the blog for three months.
On the upside, an empty house means more time to enjoy this beautiful island :)
Last I posted, we were headed to Japan, but that all went to hell in a handbasket. Long story short we're in Hawaii instead. Not too shabby for a second choice.
I have several projects in the works, on their way, and a birthday party for my youngest this weekend, so I hope to give you more to look at soon, even if it is from a camera phone. Sigh.
I recently learned to paddleboard, or paddle surf, on a SUP (stand-up paddleboard). It's an ancient Hawaiian pastime, and I love it for many reasons. It's quiet out on the water. I like being out in the middle of the ocean completely under my own power. I get to wear a cute swimshirt so I don't burn to a crisp. And it's enjoyable even if you're terrible at it, unlike skimboarding or waterskiing, both of which I tried exactly once. You just swim out there and scramble up on the board. Boom, fun. I can even strap a PFD on a kid and balance her on the front of it.
What I'm most excited about is actually being able to see every square inch of this island in the next three years. It seems doable. I can systematically scratch things off the list. It won't be nearly as overwhelming as Europe, and the weather is WAAAAY better. So far we've been to a new beach every weekend. Some are quiet and deserted. Some are crowded and touristy. Some are rocky and dangerous. Some are shallow and kid-friendly. They're all beautiful. We're saving the hiking and camping for the "winter" when the water will be five degrees colder and the surf will be higher.
We joined a gym and a playgroup and enrolled Audrey in ballet, so we're getting settled :) Our goods arrive next week so in a month or so we should be feeling right at home.
We do have some plans to leave the island but I'm really not even looking forward to it. Nothing beats Hawaii. I'll change my mind, I'm sure. I've only been here two months and I'm not excited about putting three kids on a plane again, ever. We can't stay forever, but I'm sure as heck enjoying it while we're here.
Aloha and Mahalo
- Jackie
Monday, July 30, 2012
Sunday, April 29, 2012
No More Boxes of Stuff
If you don't know what TMO stands for, just think of it as a moving company. I'd rather not go into any more detail than that.
I by no means consider myself to be a seasoned veteran in my career as wife-of-dude-whose-job-I-try-not-to-mention, but I've been doing this a few years now so I do have just a few words of wisdom for you if the thought of TMO makes you crave a large glass of wine.
Basically the movers are going to come pack up all your stuff. Technically you're not supposed to pack any of it yourself, because they can be held liable if it breaks so they like to do it. In my family that means three large, strange men who may or not speak English take over my home for three to four days. I've done it by myself, with my husband, with one child and with three children, and I have a game plan.
Last time I had a three-week-old and my husband had been gone for three months so my house was A DISASTER. Nothing was in its place and shit was just thrown in boxes. I wasn't worried about it at the time but unpacking was a total nightmare. I had countless boxes labeled "stuff," "bedroom," "clothes," and "sewing machine" when at the time I did not own one. What stuff? Which bedroom? Whose clothes? It was chaos. We are still missing things.
For this reason I have endeavored to be more organized. I got smart. And here is my advice.
GOLDEN RULE: Do not overestimate your moving men. I hate to make generalizations of this nature, but there is a reason they are moving men and not neurosurgeons. Maybe there are moving men who really did aspire to this their whole lives, got college educations, and are perfectly competent, but I fear you are more likely to get the other ones. The ones who don't give a shit whether it's your grandmother's vase or a granola bar they are wrapping up to put in a box. The ones who don't think maybe they shouldn't put your wallet in a box, or drop that piano on your baby's head. Make it easy for them.
#1: Decide what you do not want them to pack and get it out of your house. This is to include but is not limited to: Your car keys, diaper bag, trash, open boxes of food, your carry-on ready to go to the airport, your luggage you plan to check, your toothbrush, the shoes you plan to wear that day, anything that does not belong to you, pets and small children. Putting it in a spot and labeling it may not be enough. It has not worked for me in the past. At all. It has to leave the house. Put it in your car. You may think it's okay to leave your candles out, because they should know they are not supposed to pack those, right? Wrong. That's fine if unpacking your candles would be a pleasant surprise to you but if it melts all over your throw pillows, you won't be happy.
#2: Do not clean. That's right, I said do NOT clean. Unless I am wearing it or eating off of it, it does not get cleaned in the two weeks before TMO comes. I don't mean de-cluttering, I mean scrubbing. They are going to track their muddy feet all over your house and touch every door handle with their dirty hands, and probably use your toilet. Wait until they've gone to clean the house. Yes, it would be better to spread out the cleaning over a few days, but it's probably not going to happen. Luckily my current landlord does not require me to clean windows (YEESSSSSS!).
#3: Put everything where it belongs. (De-cluttering, not cleaning.) They are not going to see a toy in your bedroom and think to themselves, "Hmm, maybe I should put this in the same box as all the other toys." Refer to the golden rule. They are going to shove it in the box with your pillows. When you're desperately searching for the toy in your new house, you won't know to look in the box with your pillows. Put it where it goes. Because of the state of my house the last time we moved, I had countless boxes labeled "stuff." It SUCKS to unpack a box of "stuff." They weren't kidding, either. It was random crap from all over my house. PUT IT WHERE IT GOES.
#4.: Consolidate. I am putting all of my bathroom stuff in one bathroom. That way when I unpack the box labeled "bathroom," I will know exactly what is in it. I won't have to wonder which bathroom they got the stuff out of. Put all your blankets in the same place. All your craft stuff in the same place. All your purses in the same place. All your books in the same place. When you open a box labeled "purses" and the one you're looking for isn't in there, it's a bummer.
#5: Label rooms. "Bedroom" is not an acceptable description to me when we have 5. I labeled our rooms "Baby," "Girls," "master," "office," and "playroom." Knowing which room the box came out of makes it a lot easier to determine what room it goes into in your new home.
#6: Label stuff. A cricut isn't a sewing machine, a bumbo isn't a helmet, a bouyancy control device isn't a life jacket, and an oriental room divider is not a screen. If things are not properly documented, and they go missing, you cannot claim there was an original Picasso in the box if they wrote "child's fingerpainting." Refer to the golden rule.
#7: Get your kids out of the house if you can. Your husband would rather deal with the movers all day by himself than handle three kids running all over the place. You two-year-old doesn't understand that it's not nice to trip someone carrying a couch. And who are we kidding....if you were home with them, you would just be keeping them busy all day, so why not get yourselves out of the way? Go to the zoo. Go to the park in another state. Just go.
#8: Buy them lunch. They might treat your stuff better, and they won't have to go out to lunch for two hours.
#9: Know what you are entitled to. They are supposed to unpack your boxes and take the packing materials with them. In Germany this was a big deal because of their recycling laws. I didn't want to dispose of the boxes myself, and had nowhere to keep them, so I asked them to unpack. They proceeded to literally turn a box of books upside down in my living room. I decided I didn't want them to unpack the kitchen....
At your destination, they will give you a checklist and you are to check off every box as it comes in. CHECK OFF THE LIST. Do not let them leave if your stuff is not all accounted for. You are entitled to this.
These little things will not alleviate all your problems. They will still put ONE purse in a box FULL of clothes, and label it "purses." They will still crumple your custom tapestry into a box and label it "throw rug." But this might just make it that much better.
Good luck to my fellow spouses :)
Thursday, March 15, 2012
Zebra Quilt

I saw this jelly roll at Hobby Lobby while I was in the middle of the Bumblebee Dresses and I just couldn't resist. I love the punky purple prints. I thought about doing a rag quilt but I am currently turned off by the idea of quilting individual pieces instead of the whole thing at once, so I'm putting that off. The jelly roll quilt tutorials I found were all rag quilts so I read a traditional quilt tutorial instead and followed those basic guidelines. This one at Diary of a Quilter is great; it's simple and easy to follow, and broken down into sections so you can read about each step in detail if you need to.

First you just sew the jelly roll together to make your quilt top. I started out with a seam allowance that was too small and it unraveled a bit. I wanted more of the fabric to show but obviously I don't want it to fall apart as a result.

Then you add a border if you want one. I thought the zebra print looked great with this jelly roll, even though I am NOT an animal print person. At all.

Then you choose a backing fabric and purchase some batting. Unfortunately I bought my border fabric and my backing fabric at the same time, using the measurements of my quilt top WITHOUT the border. Rookie mistake. So you can see, I had to cut off some of my border from the finished quilt before binding it because the backing fabric was not big enough.
Measure twice, cut once, people.

The binding is that purple edge around the whole thing that binds it together, like a book, joining all the layers or pages together to create a finished project.

I was in line at the store with my batting, binding, and backing and I asked the saleslady if my little Janome would handle the quilting. (Quilting, by definition, is sewing three layers together all at once so I was worried). I didn't know if I needed a walking foot. After learning what they cost I decided I didn't. The sales lady said, "Oh yeah, the Janome has the power to quilt. I know for a fact it can sew right through corset boning."
Oh. Really. Corset boning. Good to know. I'll have to remember that if I'm ever on Jeopardy!. Not sure I would tell a perfect stranger that I'm an expert on corset-making, but whatever. Come to think of it, the lady who cut my fabric said she was releasing it from its bondage, so maybe I need a new fabric store.......
Anyway I got home and added my border and it looked pretty good, and then I was a little dismayed when the new quilt top was too big for the backing. I pin-basted it anyway, and got to quilting. I went with a grid. I don't know if you can tell, but my lines are really crooked. I don't care, I made a quilt :) Then I went the other way and sewed along the existing seams, "in the ditch." Those lines are a little straighter. I have to say I was really proud of my machine - not a single hiccup quilting this guy. I want to make another one like RIGHTTHISVERYSECOND.

Then I laid my quilt on the floor (laid being the past tense of lay.....dammit) and trimmed off my zebra border :( You can see it's not even all the way around, but it would have been if I'd bought enough backing fabric.
And then the binding, for some reason, was my favorite part. Maybe because I was so close to being done, and I thought I might actually pull it off, but I think mostly because it's more precise, methodical work. You gotta pin it all in place around the edge through all three layers, and miter the corners, then sew it on one side and flip it over and pin the other side before sewing it. And then you have a QUILT!

I've heard of people taking 20 years to finish quilts so I hesitate to tell you it took me four and a half days, even with three kids, cooking, cleaning, ripping out seams, cutting off edges, and running out of binding. I started Saturday and finished Wednesday.
I like it :)
Friday, March 9, 2012
Bumblebee Dresses
I saw this beauty on Pinterest and was intrigued by the idea of purchasing pre-cut coordinating fabric to use for a project. It took me a few weeks to find a jelly roll in the store ( Wal-Mart ) I really liked and this is the end result:

Upon laying out the fabric on my living room floor I decided I wanted horizontal stripes instead of the original vertical by Cheri over at Moda Bake Shop, and laying it out that way I was able to get all three skirts out of one jelly roll (one strip of the jelly roll made all six straps). I picked up some pre-cut 5.5" squares of matching fabric and laid them against some store-bought dresses to figure out what the bodice would look like.

Because I was dealing with pre-cut fabric I decided to make two tubes (bodice tube and skirt tube) instead of four flat pieces to sew together. This is a little more difficult to put together in the end but I didn't want to cut the squares or have to match the stripes on two different side seams.

First I made the skirts. The 4T is 9 strips long, the 2T is 8 strips long and the 9m is 6 strips long. This left one strip to use for the straps. I ruffled the tops of the skirts and set them aside.

Next I sewed the zippers between two squares of matching fabric and sewed more squares to it to create the "tube" bodice. I didn't cut any shape to it or anything, they're just tubes.

To attach two tubes together, just like pants legs or shirt sleeves, you turn one of them inside out and put the other one inside it, so it looks like this.

(that's not a baby butt in the background. it's the back of a knee :) )
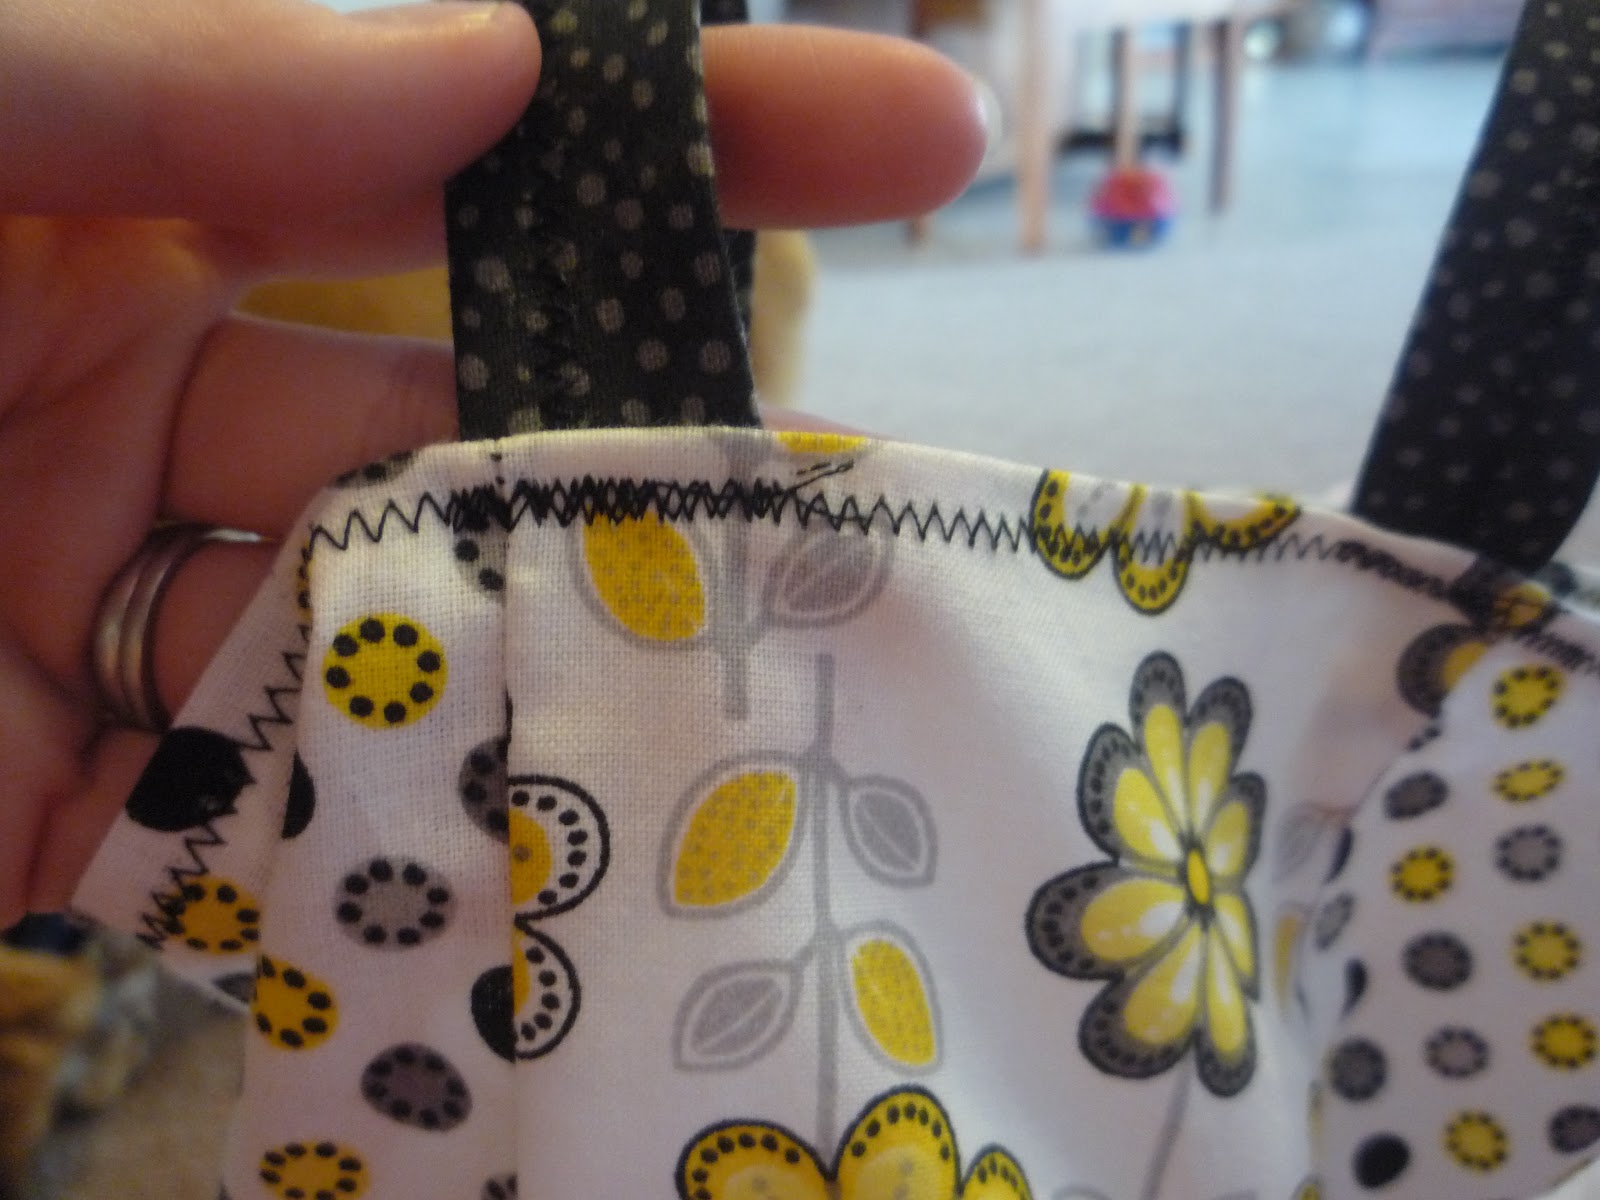
Then you rearrange the ruffle so it matches the bodice and you pin it all together before sewing. Stitch it together and you have a dress :) I tried the strapless dresses on the girls and measured over their shoulders to see how long the straps needed to be. (Let's face it, a strapless dress is not going to work on these kids. The straps are necessary to keep their torsos covered.) I cut the jelly roll strip to the appropriate lengths, then folded in the raw edges and pressed them before sewing to create the straps. I find this to be easier and neater-looking than sewing it inside out and inverting it.

I like a zigzag hem at the bottom.

And I went ahead and did a zigzag hem at the top too. On this one you can see the straps were an afterthought, but on the other two, I pinned the straps to the dress as part of the hem so it looks neater.
I finished the longest inside seam but I will let the others fray and soften and see how they do over time.

Monday, March 5, 2012
Simple Little Girl's Dress
I am slowly moving up in the world of sewing :) I tried some simple beginner projects and had some failed experiments before I felt like I was ready to try something I thought I could get some use out of. Here it is!

To be sure it would fit, I traced an existing dress that fits my daughter well, adding roughly half an inch to the entire perimeter of each piece for seam allowance. I trace with chalk directly onto the fabric, but I think I'll start making some patterns with wax paper so I don't have to keep finding a good dress to trace.
This is just four pieces, front bodice, back bodice, front skirt and back skirt. The skirt started as a rectangle and then I ruffled the top to the same width as the bodice. If you don't know how to ruffle, you can youtube it, but I do want to make my own video tutorial for that because I found the existing ones hard to follow.

I cut the back bodice in half and inserted the zipper. (Don't leave this for last. It won't work.) I hemmed the sleeve and neck openings, then attached both bodices to their respective ruffled skirts.

Then I wanted a little something extra and I had this pretty ribbon, so I edge-stitched it in place across the top of the ruffle. I did this before attaching the front to the back because I wanted the side seam to be continuous, without the ribbon just tacked on at the end.

Now to attach the front piece to the back, I lined up the ribbon, because if this is not lined up it will really be noticeable, whereas anything else would be fixable. I sewed the front to the back and finished the inside seam with a zigzag stitch (I don't have a serger). I also really like french seams but I never remember to leave enough seam allowance.

I didn't hem it but instead added the ribbon to the bottom raw edge, so I hope it doesn't fray too much.

It was nice and simple and doesn't look as home-made as many of my other projects. I would like to give you guys a full tutorial, but I've got to remember to stop and take pictures. Also, I read so many tutorials myself, being a beginner, I feel silly writing one. I figure if you know half of what I do about sewing you can figure this out on your own just like I did. But then some people really need directions, whereas I like to branch out and do my own thing.
I'm working on a set of matching Jelly Roll dresses that were inspired by another blog, but I think might be different enough for me to write about later :)
I'm also DYING to make a quilt, but am trying to patient enough to acquire enough scrap material to do it with.
Sunday, February 12, 2012
I made baby food!
With my first two children, we were WIC participants so I used the jarred baby foods, but we no longer qualify so we decided to start making it. I've read a few baby food blogs so I had a vague idea of how to do it, but I didn't want to follow a recipe.
So I just went for it. We had sweet potatoes, carrots, and applesauce on hand, and these are things my six-month-old has already been introduced to, so I had no problem with mixing them together, or with other things to acheive the desired results.
I started by wrapping the sweet potatoes in foil and putting htme in a 400 degree oven, knowing it would take a lot of cooking to get them soft enough for Baby. I then rigged up a steamer and put my carrots in it. After half an hour, they were still hard as rocks so I transferred them to the oven. After anoither 45 moniutes, they were still not mashable, so I caved and put them in a pot on the stove, barely covering them with water.
The reason I didn't want to boil is that too much water is not good for young babies, and when you boil something in water, the water itself soaks up many of the nutrients. Baking or steaming is healthier.
You do need some moisture, though, when you're pureeing, so I made some formula and pulled out the apple juice and applesauce. I tried just pureeing the vegetable itself and it was clear I needed to add liquid.
I mixed the sweet potatoes with some formula and apple juice before pressing it through a sieve. I separated it into three portions. The first I put into my mini-muffin tin for freezing (I don't have ice cube trays). The other two got their own bowls, to later be mixed with carrots.
When the water started evaporating from the carrots on the stove, I replaced it with apple juice. When they were fork-mashable, I removed them from the water and ran them through a sieve. This gets to be a pain in the ass and the result will be watery, but you can always add cereal to it at feeding time. I added half the carrots to some sweet potatoes and half to some applesauce, also adding applesauce to the third division of sweet potatoes. I put some in the mini-muffin tin, and some in my cute bug molds, which are about 3 times the size of a mini-muffin cup.
I labeled freezer bags : Sweet Potato Carrots, 4 Feb 2012; etc. Once they were frozen solid, I put them in their corresponding bags and now they're all nice and neat in my freezer :) A couple hours on a weekend will keep Baby fed for quite awhile. I estimate I made at least 15 servings, maybe closer to 20.
For the next batch I'm going to try some broccoli and canned pumpkin puree, and maybe bananas, but I'm not sure how they'll freeze.
Yesterday I made boxed mac and cheese for my older two, and put one of these guys in the mix! Delicious and nutritious :)
Friday, February 3, 2012
Turns Out I Can Sew!
I bought myself a sewing machine shortly after Christmas and have hardly given it a rest. I bought for the express purpose of keeping my baby clothes. This may come as a shock to you, but I've known for months: we are done having babies, by choice, and I am kind of excited about it, haha! This meant, however, that when Aurelia outgrew the newborn clothes, my husband wanted me to sell them. These are clothes all three of my girls have worn at their tiniest and I didn't really want to part with them. So I devised a plan.
I would cut the most adorable squares out of every item and sew them together to creat a quilt-like blanket. I say quilt-like, because I'm pretty sure a real quilt has to actually be quilted.
So that's what I did :)

Then I wanted it to be a little bigger so I created a border with some adorable butterfly fleece. I then cut a rectangle the same size as the whole blanket to cover the back.

Gorgeous blanket all by myself!!

I also made this fort-like tablecloth.

These were my first two projects, so they are "what I learned on," essentially. There is A LOT to learning a sewing machine. I thought I would just plug it in and start sewing. No such luck. You have to wind the bobbin, thread the needle through 6 tension points, draw up bobbin thread, and then test it out to see if your tension is at the right setting, which it most definitely is NOT, and you spend a few DAYS watching YouTube and experimenting with tension and bobbin orientations before you finally have it down.
Once I figured out HOW to use the machine, I was ready to attempt what I had been assured was an easy first clothing project:
Pillowcase dresses!

I love dressing my girls alike so I was excited at the prospect of choosing the fabric and making matching outfits all by myself!! I read several tutorials on pillowcase dresses but this one from Crafty Gemini was the one I liked best. While we've never met, Vanessa and I have a lot of mutual friends so I checked her out first.
Here they are :)

They are a little snug. Sizing seems to be my biggest problem; everything I make is either too big or too small.
I have come across a lot of amazing sewing projects on pinterest. This one from Sweet Verbena is awesome:

And so is this one from Make it and Love it:

Those sleep sacks are 20 bucks in the stores, and I made mine with LEFTOVERS! Amazing.
In short, a while new world of crafting has opened up for me and I am up to my eyeballs in bobbin thread :D
I don't have to tell you I'm usually better than this at posting on time, but clearly, I've been a little busy :)
Happy crafting.
Subscribe to:
Posts (Atom)