Thursday, August 30, 2012

Mickey Quilt

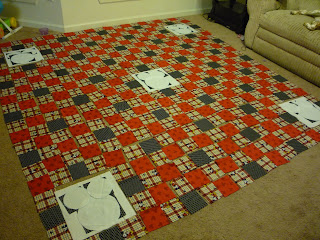
We're a Disney family.  You knew that already.  So when I stumbled across some Mickey fabric from Hobby Lobby I had to make a quilt for my mom.


She's been following the process on facebook and so far she loves it.


This is a queen-sized quilt with over 400 little squares but it went together really quickly.

First I came up with a design and mapped it out on graph paper to determine how much fabric I would need.  I had seen paper piecing circles before, but am still intimidated by that technique, so I figured out my own way ;)


After cutting all the small squares, he next thing I did was assemble the Mickey ears and applique them to the white blocks.

To do this I cut a black square and a white circle.  The diameter of the circle is the same as the diagonal measurement of the square.  (roughly.  It doesn't really matter because I was cutting away excess.)


 I sewed all around the circle (right sides together) and then trimmed the seam. This to me was easier than cutting extra circles before sewing them. Then I cut a slit in the white fabric, which will not be seen in the final quilt, and turned the whole thing inside out. Give it a press and you've got perfect black fabric circles with finished edges. :)


I pinned it to the white block in my desired orientation sewed around the edges, and it turned out super cute!!!


Then I just assembled the rows like a traditional patchwork, pressing seams in opposite directions row by row and nesting seams to create perfect lines in the quilt top.


I love it :)


You can see it's symmetrical - five rows across and down between the top Mickeys and the middle Mickeys.  I think with a quilt like this, you should map it out first even if you want it to look wonky.  I didn't quite have enough of the plaid fabric so I had to make changes before sewing.  That's something you want to find out as early as possible!


The quilting was intimidating but I had nice crisp seams to guide me and was able to do it with no problem after rolling the quilt tightly so it would fit in the little gap of my machine.  I went with simple diagonal lines, and squares quilted around the Mickey blocks.


I gave it a wash and it's ready to send off to Mom!


See ya real soon!

Tuesday, August 28, 2012

Chunky Chevron Baby Quilt

My husband has flat-out refused to buy me a new camera, and this technologically impaired girl had to figure out how to transfer photos from her phone to her computer, but I think I finally have it figured out so here we go :)


We received our household good a few weeks ago and I made myself put away some important stuff before I allowed myself to dig out the sewing machine.  I have to appear to have my priorities in order, you know.  But now I'm back in business.

The first thing I did was finish my mother's Mickey Mouse quilt, which I will definitely blog about because I'm pretty proud of my original design.

But first I want to talk about Amy Gibson over at Stitchery Dickory Dock .  She teaches a free quilting class at Craftsy.com (seriously free, just sign up and watch the video tutorials) that I've been taking and that's where this quilt came from.  The best part of the class for me was obviously that I could start it in Mississippi, take it with me to Virginia, and finish it in Hawaii.  You watch at your own pace and choose whether to do the lesson that month.  I just love to watch and get ideas!  She takes you through fabric selection, cutting, piecing, nesting seams, pinning and sewing so you get really detailed step-by-step instructions.  Amy also has great tutorials on her blog.


This is the block that Amy taught in February, the Chunky Chevron.  I wanted to do a whole quilt of these blocks for my friend having her first baby in October.  The gender is going to be a surprise.  I'm actually pretty excited about that because I don't work with these colors very often.  Put twelve chunky chevron blocks together and you get a whole quilt top!!


So I mapped it out on paper to see how the colors would work.  You can see I had to alternate colors between rows so the yellow and green triangles would turn into zigzags on the middle row.


I LOVE how this turned out.  I love the colors, I love the subtle print on the white fabric, and I love the way the quilted lines made this design of rectangles and squares.


I stumbled upon a second free Craftsy class taught by Elizabeth Hartman of Oh Fransson on how to jazz up your quilt backs so I used up some scraps on the back of the quilt too. I just adore it! I almost wish I didn't have to give it away, but I can only have so many quilts in my house.


Thanks for reading :)